While removing old doors can be fairly straightforward, there are many more boxes to tick and things to avoid when installing new doors, from picking the right materials to getting your door perfectly plumb. For excellent results and a smooth installation, learn from previous homeowners’ oversights and discover practical, reliable solutions.
The following are common new door installation mistakes to avoid in your home.
Quality tools in good condition are essential for accurate, safe work. Essential door installation tools include a sharp chisel for embedding hinges and a level to check alignment. You’ll also need a stud finder, a tape measure, a drill, a utility knife, plenty of shims and safety gear.
The door type you select must be appropriate for its location. Interior doors, for instance, seldom have the rigor needed to face outside conditions. For enhanced security and insulation, choose high-quality exterior doors, considering highly durable materials like Fibrex®.
Wall openings aren’t all one standard size, especially in older homes. Always measure the opening using a tape measure and jot down its height and width in at least three places, and preferably have your door custom-built to fit your exact measurements.
When measuring the door opening, remember to leave room for adjustments. Subtract about ¼ inch to 1 inch from your measurements, creating what’s called a reveal. This gap lets you fine-tune the door’s position within the opening, ensuring it’s perfectly plumb and level using shims.
The door frame should be slightly thinner than the wall so the trim can sit snugly without protruding beyond the wall. If the frame is too thick, the trim could potentially interfere with the door’s operation.
A level is essential for a door that swings correctly and latches properly. Use a level to ensure the door frame is plumb in both directions, checking both the hinge and strike sides. You can also use a suspended weight called a plumb bob to verify vertical alignment.
Uneven floors and sills can cause uneven gaps and restrict the door’s swing. Assess the floor and sill height using a level, noting any variations and slopes. Then, level both the floor and sill as needed. For concrete floors and sills, use a self-leveling compound to create a smooth, even surface. For wood floors and sills, use shims.
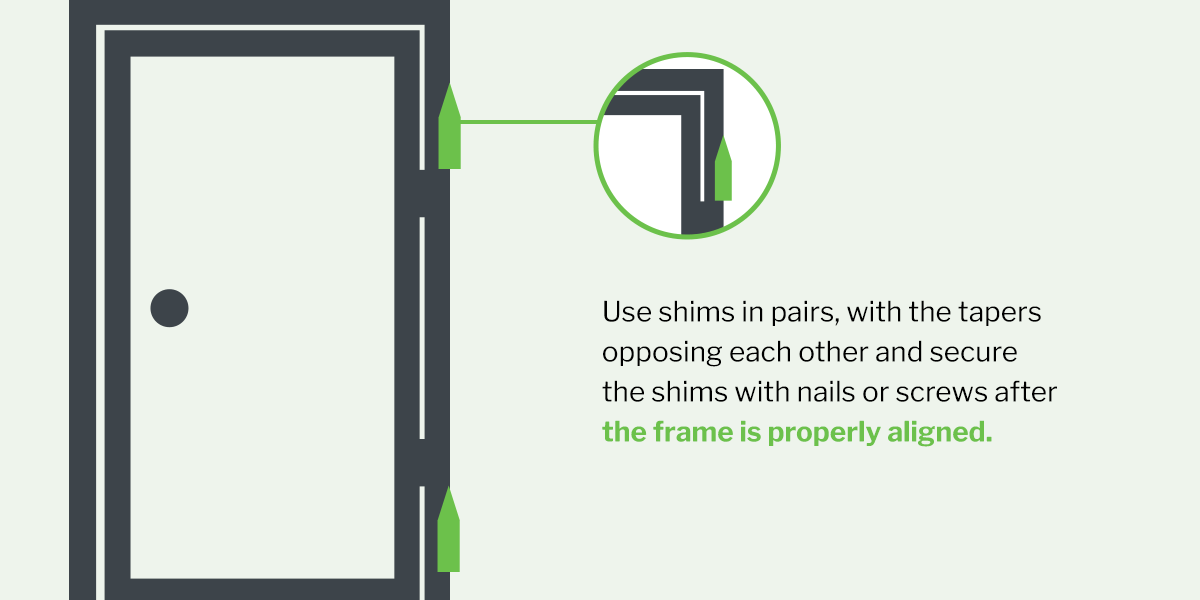
Shimming incorrectly or not at all can distort the frame. Use shims in pairs, with the tapers opposing each other, to avoid creating pressure points, and secure the shims with nails or screws after the frame is properly aligned, avoiding over-shimming to prevent distorting the frame.
Improper screw usage can strip the screws or damage the door frame. Use the correct size screws – typically longer screws for the frame and shorter screws for attaching trim. Consider pre-drilling pilot holes to prevent splitting, especially when working with hardwoods. Avoid overtightening, which can strip the screw heads or damage the surrounding wood.
Hinges must sit flush with both the door and frame for proper operation, which requires carefully cutting a pocket or mortising. The same is true for strike plates, the metal plate on the door frame where the door latch engages. Mortising too deep or not deep enough prevents a flush fit, so use a sharp chisel and a mortising gauge for precision.
To prevent door sagging or binding, ensure your hinges are accurately aligned both vertically on the frame and parallel to the door’s edge. Use a level or straight edge to check the alignment, marking their positions carefully before installation and using a consistent reference point, like the top of the door, to ensure accurate placement.
Ensure you seal the seams and joints around exterior door frames. Choose a silicon-based caulk for optimal weather resistance and longevity, or pick an acrylic latex caulk designed for exterior use if you want to paint over it. When caulking, carefully apply a smooth, even bead of caulk to all exterior seams, especially at the top and sides.
You can save money on energy bills and control your home’s temperature better if you fill the larger gaps around exterior door frames with insulation. Ensure a tight seal, but be careful not to over-expand the foam, which can distort the frame. Ideally, select a foam-filled composite exterior door for optimal insulation, and you may be eligible for a tax credit.
Prevent drafts with properly applied weather stripping, ensuring it’s adequately compressed against the door when closed. You may also want to install a threshold seal or adjustable threshold and apply a bead of compatible exterior-grade caulk or sealant along its edges.
Before adding finishes, it’s important to sand wooden door surfaces with fine-grit sandpaper so they’re clean and free from debris. Apply a primer before painting to create an even, monochrome base for the paint to stick to. To prepare other door materials for finishing, consult the manufacturer’s instructions.
With a gentle hand, apply thin, even coats to the prepared surface, and allow each to completely dry before doing the next one. For interior wood doors, choose water-based latex paint for cost-effectiveness or oil-based paints or stains for a smooth texture and a classic, glossy finish. For exterior wood doors, use acrylic latex paint for added weather resistance or an oil-based stain for rich color.
Choose the right combination of paint and applicator. For wood doors, use a high-quality brush with natural bristles for oil-based paints and stains and a synthetic bristle brush for water-based paints like latex. You could also choose a foam roller for smoother surfaces or a short-nap woven roller for lightly textured surfaces. Just make sure you buy a solvent-resistant foam roller if you’re using oil-based paint.
Doors come in all sizes, materials and functions. For best results, always check the manufacturer’s recommendations to double-check the best materials, tools, solutions and techniques for your specific door.
A few key considerations can help you make informed decisions and master your door installation project.
Review the manufacturer’s instructions and online resources to learn the best materials, tools and finishes for your needs. Look for quirks in your home’s construction, like a settling foundation, and plan your installation around them. Learn about your family and friends’ accessibility needs and research which door types best accommodate them.
The gold standard for new door installation will always be the work of a professional, especially one that custom-makes doors to perfectly fit your unique home. A reputable door replacement company will already have all the tools, materials, skills and experience needed to install the perfect door.
If your home has doors that need replacing and you want long-lasting, stunning results, the professional team at Renewal by Andersen is ready to assist you. Choose from our exciting range of customizable entry, patio and French doors, and we’ll take care of the rest, from measurements to installations and finishing touches.
To get started, book a complimentary consultation online today.